VIDA PTA
  • Home
  • Join PTA
  • Volunteer
  • Español
  • Events/Programs
  • Store
  • Contact Us
.
​


​
JOIN

Hot Cocoa Kits

12/17/2021

 
Picture
Hey there! 
You must have bought or were gifted one of our little Hot Cocoa Bomb Making Kits and you are here for some helpful tips! Or your 4 year old colored the pretty label with sharpie and you can't read the instructions any more! We got you!!
​
Picture

Basic Instructions

Make chocolate cups
1. Get all the ingredients together and melt the chocolate in the microwave safe bowl.
2. Add the chocolate to each cup mold.
3. Spread the chocolate in an even layer to coat the mold, but make sure the layer is not TOO thin.
4. Place the mold into the fridge or freezer for 10 minutes or until set.
Fill the cups
1. Once the chocolate is set in the mold remove from the freezer and pull the mold off if the chocolate.
2. If you'd like you can use the opposite type of chocolate to drizzle over the tops of the chocolate cups.
3. Now using the bottom halves, add the hot chocolate powder to each one.
4. Add Mini marshmallows.
Seal the cups
1. Warm a small, microwave safe plate in the microwave for 45-60 seconds.
2. Place empty half chocolate cup on the plate for a couple seconds until it begins to melt the edges. This creates an even edge and a sort of glue.
3. Connect with the bottom filled half cup so that the edges meet. Hold for 10 seconds.
4. Repeat with the remaining spheres until they are all completed.

Helpful Tips

Picture
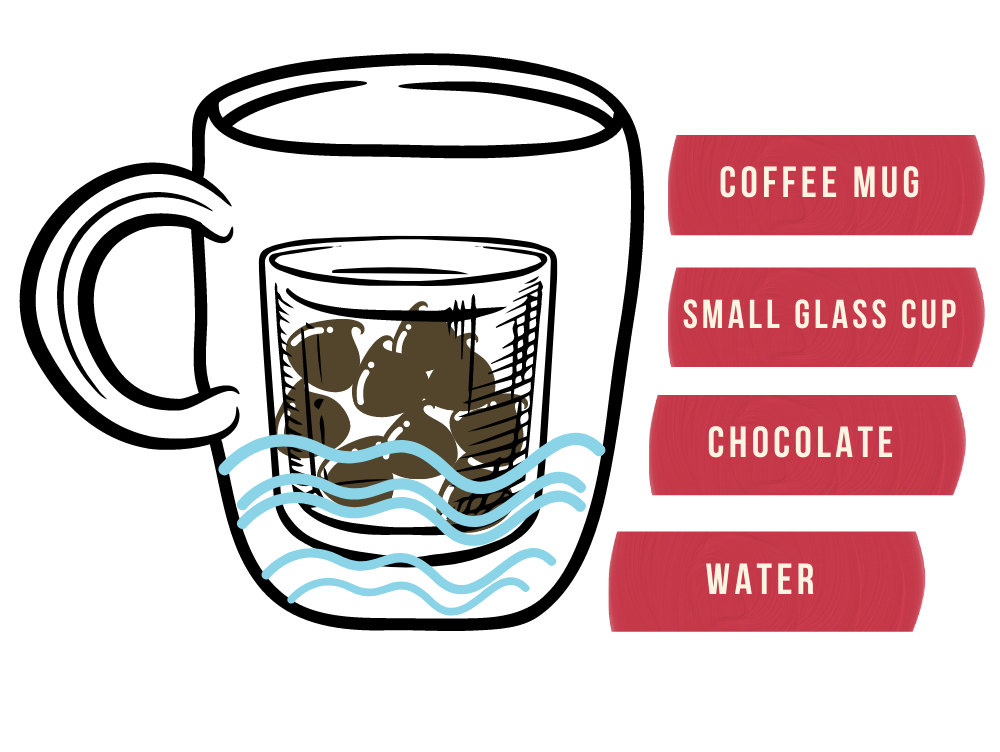
Microwave Double-Boiler Method
  1. Grab a small glass cup. We used a glass yogurt cup, like the little Oui brand cups. Something small enough for the chocolate wafers to fill the cup 1/2 to 2/3 of the way up.
  2. Grab a larger mug, large enough  for the smaller cup to fit inside.
  3. Before putting the chocolate in the small cup, place the empty small cup inside the larger mug and fill the larger cup with water about half way up the sides of the smaller cup. If you fill it too high, it might boil over into the chocolate that will be in the smaller cup.
  4. Add your chocolate wafers into the smaller cup. 
  5. Place the mug with the small cup inside, into the microwave and heat for 1-2 minutes depending on your microwave. We checked on ours every 30 seconds and stirred it with the little skewer provided in the kit. 
  6. When all of the chocolate is melted, it's done!
Spreading the melted chocolate into the silicone cups
  • In your kit is a small spoon to spread the chocolate. If using this little spoon, it works best if you hold the cup in your palm rather than holding it with your fingers or leaving it set on a plate.
  • You'll want to rotate the cup around tilting it to allow the chocolate to spread into the grooves. You need a solid layer. If you have a pastry brush, it works even better to get the nooks and crannies of the silicone cup fully coated.
  • Another option would be to do a single thin layer, place the cup in the freezer for a minute and take it out and repeat a second layer to ensure an even coating.
Batching your chocolate tops and bottoms
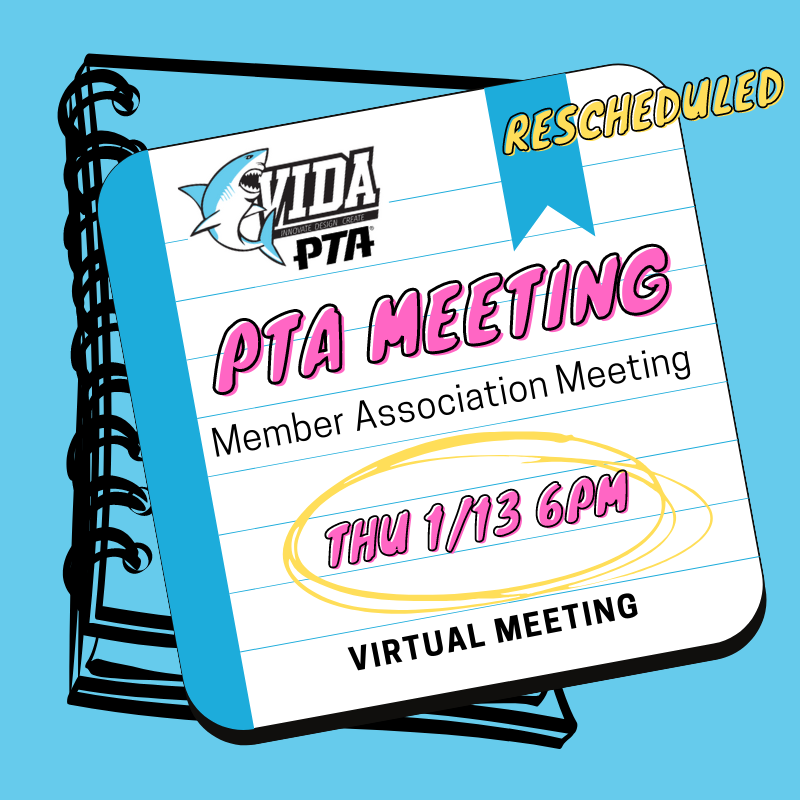
  • You should have received 4 silicone cups in your kit but enough supplies to make 4 cocoa bombs.
  • The method we prefer is to make 4 bases at a time and let those harden up before making your 4 tops.
    • If you are using the microwave double-boiler method, you can reheat your chocolate when you are ready to make your tops.
    • If you use the direct heating method from the kits provided instructions, you may need to split up heating half of the wafers at a time as they don't always reheat well this way.

December 16th, 2021

12/16/2021

 
Picture
AGENDA
VIDA PTA
General Association Meeting
01/13/21
6:00 p.m.
Teleconference (zoom)

President’s Report - Michelle Cugini    
  • Welcome
  • Fall Highlights

Secretary’s Report - Therese Montoya
  • Presentation of the 9/2 General Association Minutes for approval. 
Treasurer’s Report - Alana Peters
  • Ratify checks Release the remainder of the school year budget
  • Present mid year audit
Calendar Amendment
  • Present amendments to Calendar

    Donate a Box

    Shop
    Picture

    Stay connected!

    Subscribe to Newsletter

    Upcoming Events

    SUBSCRIBE TO OUR CALENDAR

    Announcement Archive

    May 2025
    April 2025
    March 2025
    February 2025
    January 2025
    December 2024
    November 2024
    October 2024
    September 2024
    August 2024
    May 2024
    April 2024
    March 2024
    January 2024
    December 2023
    November 2023
    September 2023
    August 2023
    June 2023
    May 2023
    April 2023
    March 2023
    February 2023
    October 2022
    September 2022
    August 2022
    June 2022
    May 2022
    April 2022
    March 2022
    February 2022
    December 2021
    November 2021
    October 2021
    September 2021
    August 2021
    April 2021
    March 2021
    February 2021
    December 2020
    September 2020
    May 2020
    April 2020
    March 2020
    February 2020
    January 2020

    View this post on Instagram

    A post shared by VIDA PTA (@vida_pta)

    Updates & Resources

    For the latest updates from Vista Unified and VIDA, click the links below.
    Tweets by VIDASHARKS
    Picture
    Tweets by VistaBlueprint
Powered by Create your own unique website with customizable templates.
  • Home
  • Join PTA
  • Volunteer
  • Español
  • Events/Programs
  • Store
  • Contact Us